


General
1. Where can I start to learn about Unitronics PLCs?
We have a collection of resources available for new Unitronics users.
You can download all of Unitronics available software for free from the download page
You can find a collection of recorded webinars with topics topics ranging from beginner to advanced, on our Youtube channel
https://www.unitronicsplc.com/support-join-a-webinar
You can sign up for Unitronics forum and interact with experienced users from around the world.
http://forum.unitronics.com/
You can find all of the installation guides and spec sheets for all Unitronics controllers,
as well as manuals for our software and other related documents on the technical library page
Some useful documents and instructions created by our users can be found on the PLC Tools and Applications page.
2. How can I properly build my system to protect it from electromagnetic noise?
There is some simple advice which is very helpful when one builds and wires his system.
Details about this advice can be found in the document “Minimizing EMI – System design Guidelines
Minimizing EMI System Design Guidelines
Data Backup
1. How can I replace the battery without losing data?
Note: When you replace the battery, you lose RAM values. – After replacing the PLC battery, initialize the PLC via Info Mode Info> System>Working Mode> Init. Unitronics Remote Access PC utility offers the tool ‘Backup PLC RAM’. Using this tool, you can read all PLC RAM values such as Data Tables and register values into an Excel file on your PC, and later write these Excel values back into the PLC’s RAM. Remote Access may be installed from the Setup CD, or downloaded from http://www.unitronics.com
Step 1
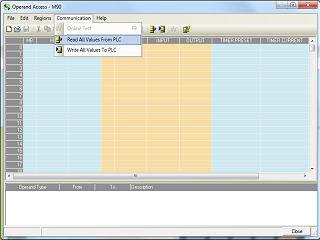
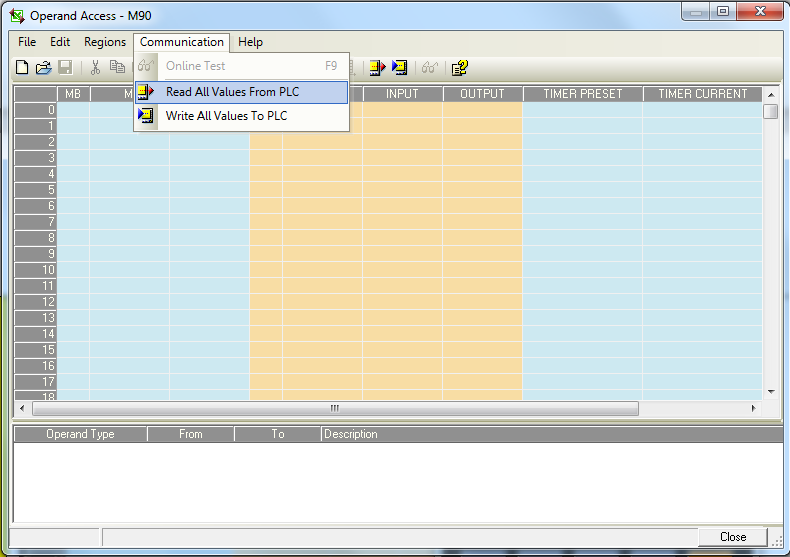
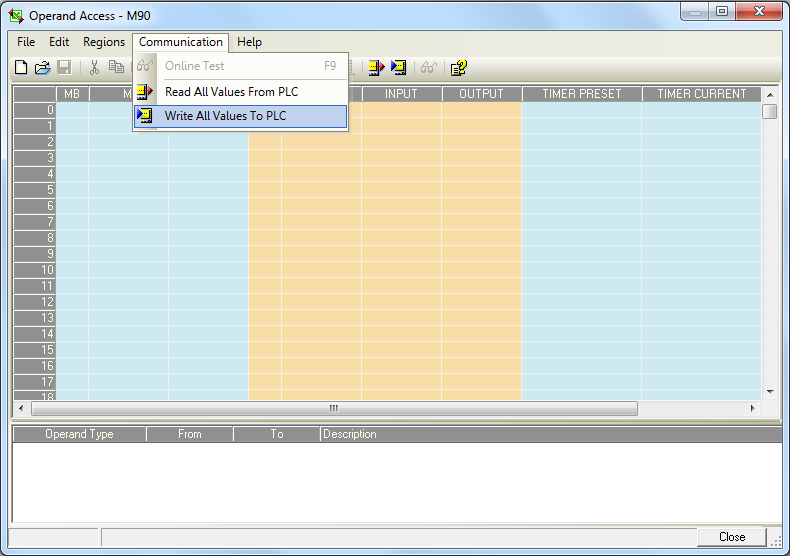
Open Unitronics Remote Access PC utility (Download) and go to Tools>Operand Access

Step 2
Go to the Communication menu>Read All Values From PLC and save it as Excel file when requested.
Step 3
Change the battery according to the instructions of the controller which you are using. You can find them on the installation guide in the technical library page. Content.aspx?page=Technical_Library
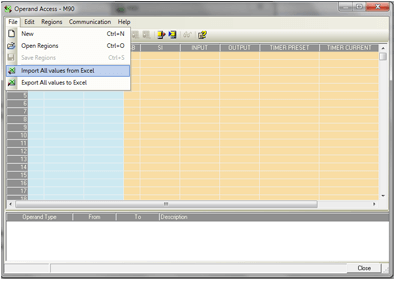
Step 4
In Unitronics Remote Access PC utility – go to Tools>Operand Access>File menu> Import All values from Excel.

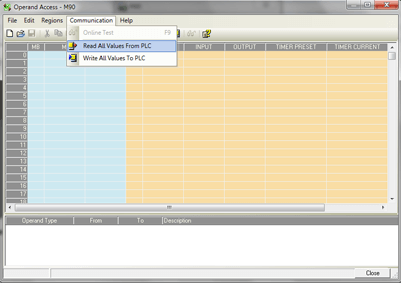
Step 5
Go to Communication menu>Write All Values To PLC.
2. What can cause the loss of operand values on power-up?
Usually – no battery backup. The reason is typically a weak or missing battery. In M91 models, as well as in all Vision controllers, if the battery is weak or missing, SB8 rises to 1. The controller has a special battery test loop. It lets SB8 rise at some time (usually 1-4 weeks) before the battery will become totally flat. If you find the battery flat and need to replace it, contact support@unitronics.com with the specific PLC model.
PLC Recovery
1. I updated my PLC (V570/V350) system files and I had power break down during the download. Now my PLC has a black screen. How can I recover the PLC?
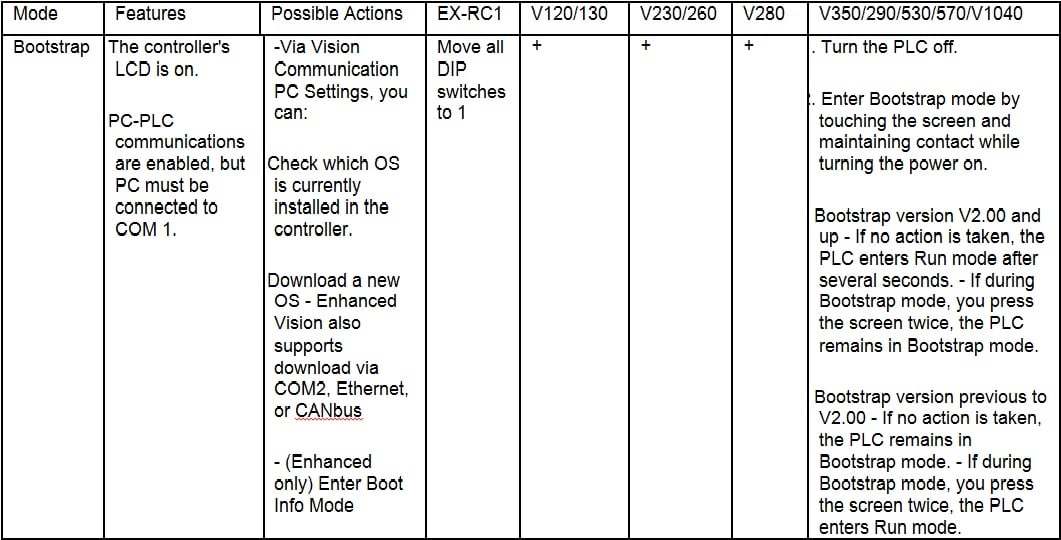
You can force the controller to boot up into Bootstrap (OS, BIOS) by turning on the power supply while pressing specific keypad keys:
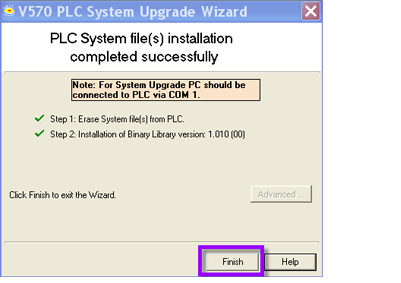
- From the PLC System Upgrade Wizard you can select “advanced”.
- You will need to install first just the Bin, then just the Boot, then just the OS.
- When it asks if you would like to send plc run command, select no each time.
- Press finish after each individual firmware process completes.
Software
1. Can I run Unitronics software on Vista, Windows7 or Windows 8.1?
Yes, you can run Unitronics software on Windows Vista, Windows 7 or windows 8.1.
We recommend for the user to run VisiLogic as an administrator and with UAC disabled.
You need to turn off the UAC before installing the software.
Please follow the guide on our forum below:
http://forum.unitronics.com/index.php?/topic/664-can-i-use-visilogic-with-vistawin7/
Running as an administrator can be accomplished by right clicking on the VisiLogic icon, choosing Properties, going to the Compatibility tab, and selecting the box labeled Run this program as an administrator.
2. How can I install previous versions of VisiLogic on my PC?
Unitronics VisiLogic software comes with an application called Version swapper.
Please follow the guide on our forum below:
http://forum.unitronics.com/index.php?/topic/662-how-do-i-use-version-swapper/
3. How can I have multiple instances of VisiLogic running at a single time?
To have multiple instances of VisiLogic:
- Copy the folder “Unitronics VisiLogic_C” from “C:\Program Files\Unitronics”.
- Paste that copied folder somewhere else on your hard drive.
- You can then open up the file “VisiLogic.exe” from “Unitronics VisiLogic_C\Main” inside each separately pasted folders.
(The typical limitation is that only a single “VisiLogic.exe” can be opened at a time, but having a copied folder “tricks” and allows this).
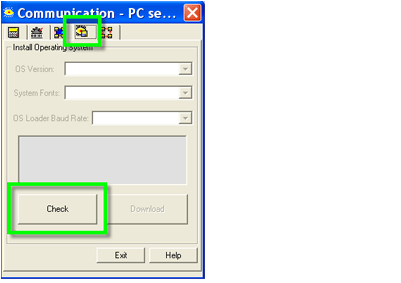
4. Where can I find and update the latest Firmware version for my PLC?
1.First make sure VisiLogic has the most up to date OS files loaded.
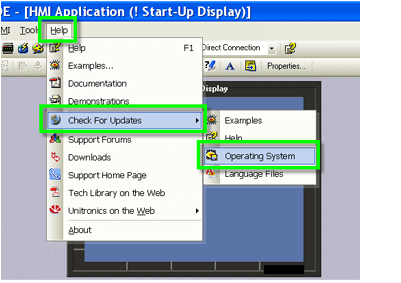
2.Next check and update the OS on the controller.

We also have a detailed document available online to go over the process:
http://forum.unitronics.com/index.php?/topic/667-how-do-i-update-an-os/
Communications
1. What are the steps communicate with the PLC via Ethernet? (PC to PLC)?
- First of course the PLC must comprise an Ethernet card.
- In the ladder code add the function TCP/IP card init after a direct contact of SB2 and configure the IP address, Subnet mask and default gateway according to your network settings.
- Add the function PLC name after TCP/IP card init and configure your PLC name
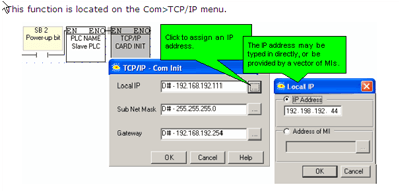
- Download the application and reboot the PLC.
- Then using VisiLogic, Remote Access, or any other Unitronics software
you can access the controller via the IP address, PLC name and the port 20256 or 20257 if you did not change the sockets settings.
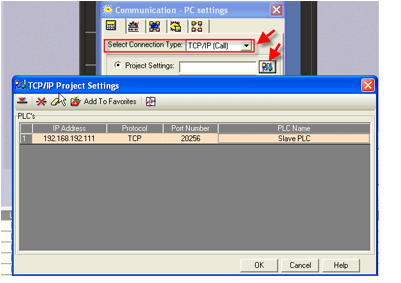
Please note that you can also configure each one of the sockets to other port number and TCP slave and later use this port number for connection.
2. How many communication sessions can I open at the same time using Ethernet?
Unitronics Ethernet card offers 4 sockets.
That means you will be able to communicate with 4 devices at the same time.
Each one of the sockets has its own default settings:
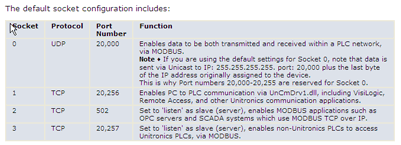
You can configure each one of the sockets to your preferred settings using Socket Init. (TCP[master or slave],UDP,HTTP,SNMP and more).
3. Can I send Email via the modem?
Yes! Using GPRS functionality basically you will need to call the mail server and use the Email function to select the relevant com port.
4. Is it possible to use SMS and GPRS at the same time?
SMS and GPRS cannot work at the same time. There is no option to send SMS while the GPRS is connected. You need to first disconnect the GPRS call (You can still stay registered) and then you need to activate the SMS config to be able to send SMS messages.
5. Can I use more than 8 numbers in SMS phone book?
In the SMS Configuration Phone Book, use an indirect vector of registers to indirectly use a number.
6. Is it possible to write my own VB6/ .NET program to communicate with Unitronics PLCs?
Yes! One can use our communication Active X component or .NET DLL (posted on our web site with working examples) to make such customized applications. But – this must be done by3 a professional VB6 or .NET programmer.
7. Which SCADA can I use with Unitronics PLCs? Where can I find Unitronics drivers for SCADA?
Our customers worldwide use many SCADA packages. For example Wonderware’s InTouch, Indusoft, LabView, Sitect, RSview etc… There are two ways to communicate with these programs:
- Via our OPC server – free download from our site www.unitronics.com;
- Via Modbus (Modicon) driver of the SCADA
If you wish to communicate using MODBUS – you need to configure the PLC to be a MODBUS slave. .NET program to communicate with Unitronics PLCs? Yes! One can use our communication Active X component or .NET DLL (posted on our web site with working examples) to make such customized applications. But – this must be done by3 a professional VB6 or .NET programmer.? In the SMS Configuration Phone Book, use an indirect vector of registers to indirectly use a number.
Logic and application
1.How can I export the PLC data tables to Excel?
You have 2 ways to accomplish this task manually and automatic:
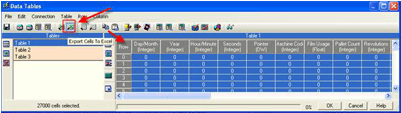
1.Manually – You can directly export the data to Excel from VisiLogic or Remote Access:
Open the Data Tables window.
While you are connected to the PLC –
Click on the icon Read/Write Tables and then select the table you wish to read and
click on Read Tables button.
After all the data is read – click on the row column to select all cells and then on the icon export cells to Excel:
2.Automatically – Using DataXport software which you can download from Unitronics web site.
Using this software you will be able to retrieve the data table or even regions of operands from the PLC automatically according to a schedule that you will determine in the DataXport project and export it automatically to Excel.
2. How many communication sessions can I open at the same time using Ethernet?
Unitronics Ethernet card offers 4 sockets.
That means you will be able to communicate with 4 devices at the same time.
Each one of the sockets has its own default settings:
You can configure each one of the sockets to your preferred settings using Socket Init. (TCP[master or slave],UDP,HTTP,SNMP and more).
PID
1. How many PID loops does the PLC support?
In Vision series controllers PID is a function block and uses memory, dedicated to FB. One can see the usage of FB PID memory in his project in VisiLogic > View menu > FB In formation, when selecting RAM Allocation.
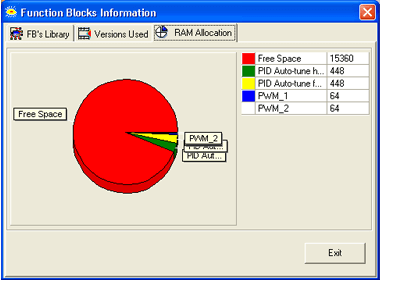
Important note: Memory, dedicated to FB is common for all functional blocks – PID, SMS, Drum sequencer, Modbus… This needs to be taken in consideration when planning your project and calculating memory resources.
2. Why is it that in standard Vision models there are Function blocks for PID (FB PID and FB PID Auto-tune) and in Enhanced models there is only FB PID Auto-tune?
The reason is better usage of the RAM memory, dedicated for FB. In standard Vision models – V120/230/260/280/290/530 FB RAM memory is 8Kbytes. One FB with Auto-tune takes 448 bytes, while the lighter FB PID – only 256 bytes. Having two FB PID enables the user to manage better the memory resources of his project. In enhanced models V130/350 the memory is 16Kbytes and in V570 – 32Kbytes. Having seriously increased amount of memory eliminates the need to handle two different FB PID. Important notes: PID algorithm in both FB is exactly the same! Auto-tune is not a “must”. It’s an independent block, which helps the user to tune easily and faster his PID loop. If the programmer will not add the module “Run Auto-tune” to his Ladder he will have the “standard” FB PID.
3. When do I need to perform PID Auto-tune?
PID parameters are unique for each specific system. They depend on the hardware of the system. Auto-tune is an independent module. When started, it performs a few On-Off cycles. It then learns the overshoot/undershoot “waves” and, according to their “dimensions”, sets PID parameters. It’s recommended to perform Auto-tune only once – when building and tuning the system. Then it can run for years with these parameters. In some cases, it’s recommended to perform Auto-tune on setpoint, about 10% lower than the real one.
SD cards
1. What brand of SD cards can Unitronics PLCs support? What is the SD maximum size? Does it support SDHC?
Theoretically, we support all types of standard SD and SDHC cards – normal size (V560/V570) and Micro SD (V130/350/1040/1210). Basically the SD card needs to have the option to be formatted as FAT32 from Windows.
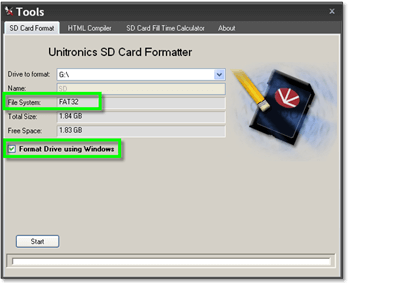
2. What do I need to do before I can use a SD card with Unitronics controllers?
- It is necessary to format the SD card using Unitronics SD Card Suite.
- These tools are available for download free of charge from our website:
- www.unitronics.com à support à downloads à Unitronics SD Card Suite: free download
- The SD Card Formatter is an available option under the “Tools” program of the suite.
- Make sure to select the “Format Drive using Windows” option first.
- After, uncheck the box and format again.
- If you experience problems with the SD card being recognized by the PLC, see notes below:
NOTE:
(Built-in laptop card readers tend to cause problems, therefore external USB to SD adapters are recommended) (In certain cases, using the Panasonic formatting tool below first, then using Unitronics tools after can also help) http://panasonic.jp/support/global/cs/sd/download/index.html
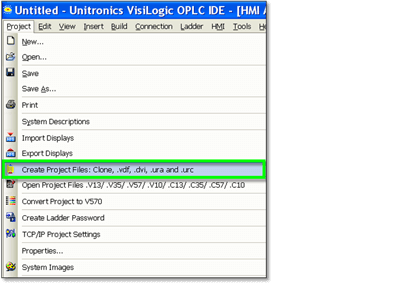
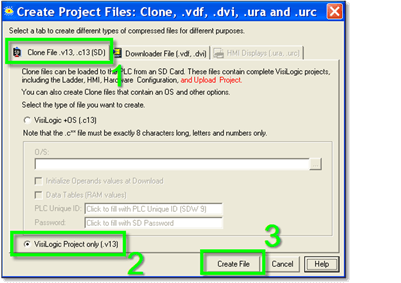
3. How can I create a clone file from VisiLogic to be loaded via the SD card?
Prepare File in VisiLogic:
- First it is necessary to prepare a project file (*.vXX) for the SD card.
- Place the newly created file in the “USER_APP” folder of the SD Card.
Load via Information Mode:
- With the SD Card inserted, hold down the touch screen for a few seconds until Info Mode opens.
- Enter the Info Mode password (default : 1111)
- Select “SD”
- Select “Application”
- Select “Upload to PLC”
- Select previously created file to install
NOTE: (SD operations can also be programmed into the application’s ladder logic now with latest VisiLogic version)